mNo edit summary Tag: Visual edit |
No edit summary |
||
| Line 36: | Line 36: | ||
**+Scare Mortar and look like a badass |
**+Scare Mortar and look like a badass |
||
*Ascend Inferno Tower |
*Ascend Inferno Tower |
||
| − | **+Kill Mortar |
+ | **+Kill [[Mortar]] |
*Destroy buzzards: 0/5 |
*Destroy buzzards: 0/5 |
||
*Steal Odomo crates: 0/4 |
*Steal Odomo crates: 0/4 |
||
| Line 42: | Line 42: | ||
===Strategy=== |
===Strategy=== |
||
| − | The preliminary targets is to get to the Arid Nexus bridge in [[Eridium Blight]] across [[The Dust]] and then proceed to [[Sawtooth Cauldron]] |
+ | The preliminary targets is to get to the Arid Nexus bridge in [[Eridium Blight]] across [[The Dust]] and then proceed to [[Sawtooth Cauldron]]. <!--The bridge to [[Arid Nexus - Boneyard|Arid Nexus]] has been blocked and [[Brick]] needs a special solution to blast the hoisted span back down to complete the bridge.--> |
Arriving at the place, Vault Hunters need to reach The Buzzard Nest at the top of Inferno Tower in order to neutralise the defending buzzards and prime the Odomo crates for pick up. Along the way are various location objectives and a lot of hostile bandits. |
Arriving at the place, Vault Hunters need to reach The Buzzard Nest at the top of Inferno Tower in order to neutralise the defending buzzards and prime the Odomo crates for pick up. Along the way are various location objectives and a lot of hostile bandits. |
||
| Line 52: | Line 52: | ||
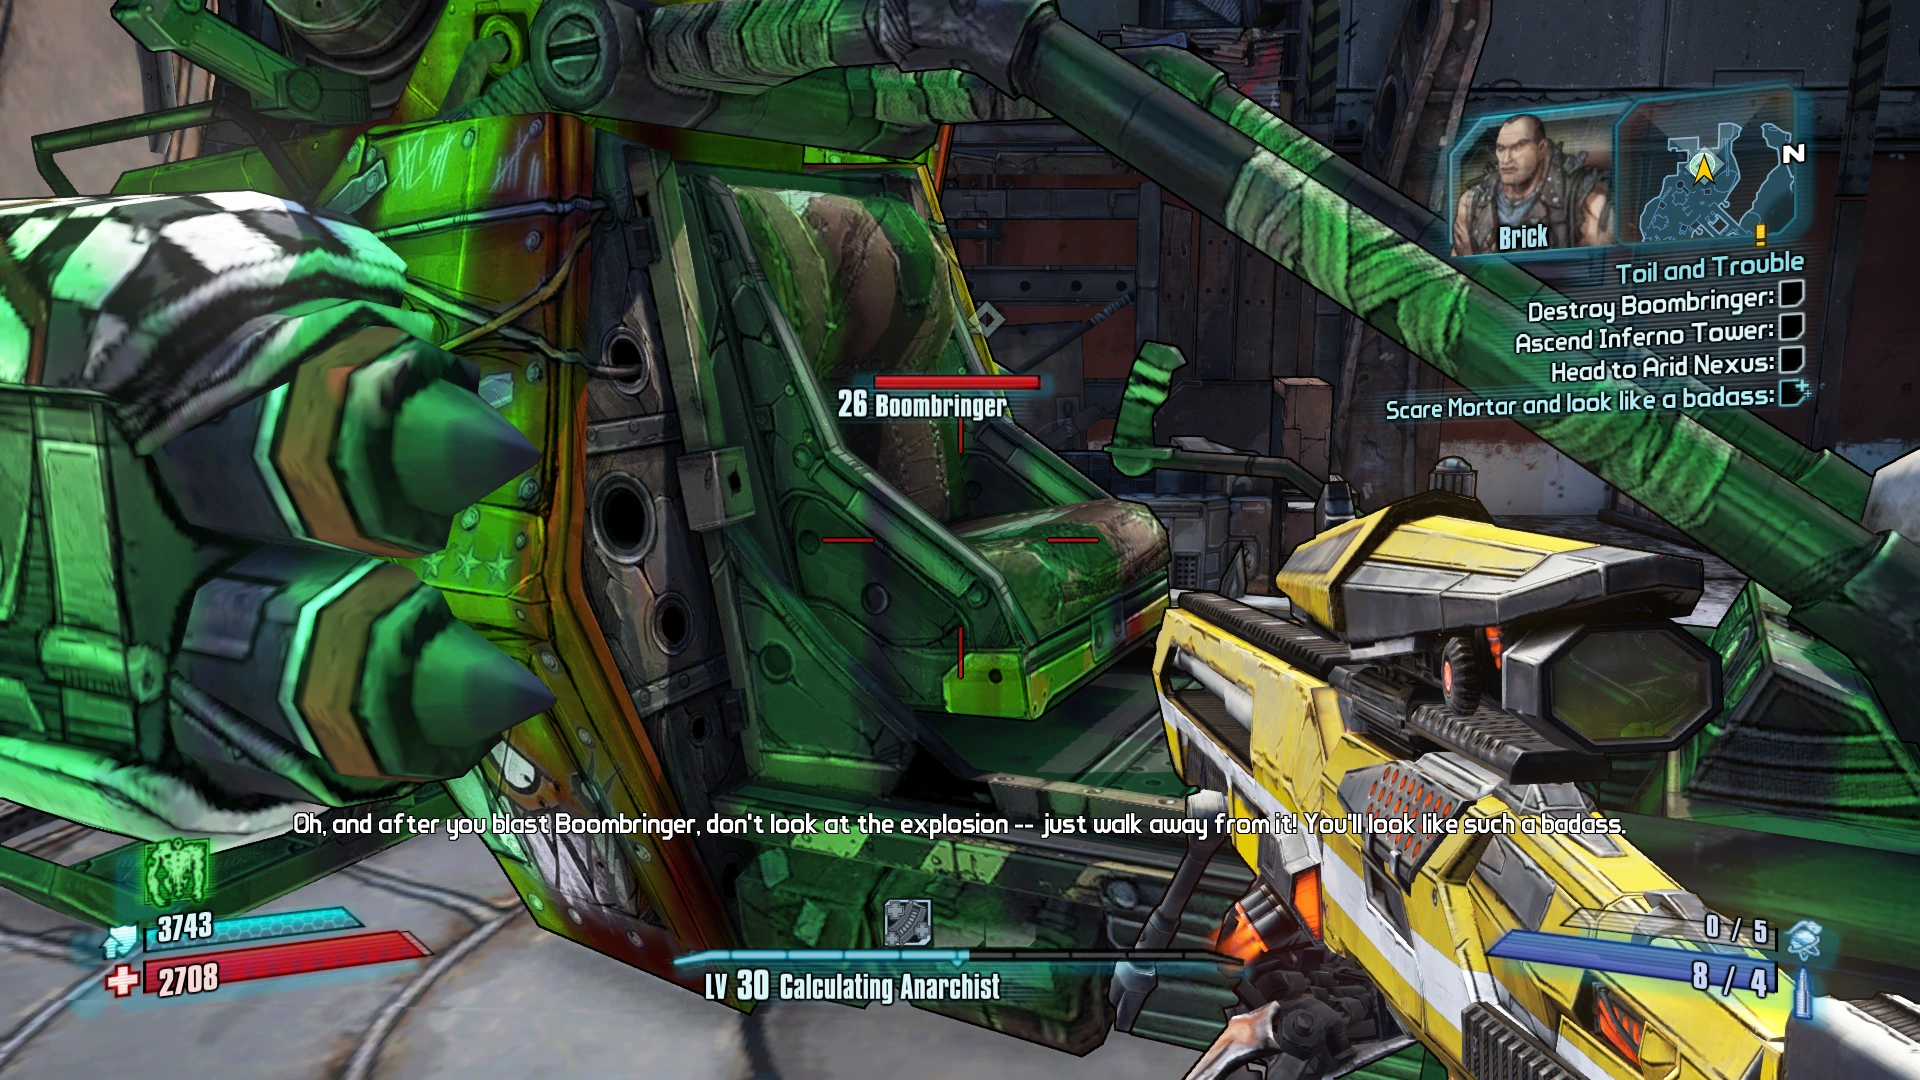
The ultimate goal is for Boombringer, a grounded buzzard belonging to Mortar. While the objective itself is a simple process of pointing a weapon at it and pulling the trigger, the path to reach it is protected by two automated Gatling turrets, several buzzards and a number of bandit units. An optional objective, prompted by Brick over the [[ECHOnet|ECHO]], is to turn away from the Boombringer's explosion to "look badass" and to scare Mortar. |
The ultimate goal is for Boombringer, a grounded buzzard belonging to Mortar. While the objective itself is a simple process of pointing a weapon at it and pulling the trigger, the path to reach it is protected by two automated Gatling turrets, several buzzards and a number of bandit units. An optional objective, prompted by Brick over the [[ECHOnet|ECHO]], is to turn away from the Boombringer's explosion to "look badass" and to scare Mortar. |
||
[[File:Toil and trouble.PNG|thumb|332px|"Cool guys don't look at explosions."]] |
[[File:Toil and trouble.PNG|thumb|332px|"Cool guys don't look at explosions."]] |
||
| − | Upon returning to the Foundry, Mortar himself arrives, down the elevator, to exact retribution for his beloved ride. The area should be clear by this point, and without backup, he is little better than a very tough bandit with a powerful gun |
+ | Upon returning to the Foundry, Mortar himself arrives, down the elevator, to exact retribution for his beloved ride. The area should be clear by this point, and without backup, he is little better than a very tough bandit with a powerful gun. |
The elevator will take characters to the top of Inferno Tower which proves to be an open deck with minimal cover. This is a problem as the regular bandits are reinforced by five buzzards, and these five must all be destroyed. Once this has been done, the four Odomo crates can be tagged for pick up by four Slab Support Buzzards. Brick will tell then the fastest and badassest way possible to get back to the fast travel station: jumping off the tower. |
The elevator will take characters to the top of Inferno Tower which proves to be an open deck with minimal cover. This is a problem as the regular bandits are reinforced by five buzzards, and these five must all be destroyed. Once this has been done, the four Odomo crates can be tagged for pick up by four Slab Support Buzzards. Brick will tell then the fastest and badassest way possible to get back to the fast travel station: jumping off the tower. |
||
| − | Vault Hunters then drive to the Arid Nexus bridge, |
+ | Vault Hunters then drive to the Arid Nexus bridge, which Brick's buzzards come to bomb for it to descend. The mission is then turned in at Arid Nexus' Catch-A-Ride. |
===Completion=== |
===Completion=== |
||
Revision as of 19:31, 11 May 2019
[[Category:Sanctuary missions]]
Toil and Trouble is a story mission in Borderlands 2 given by Mordecai. The mission is performed, starting at Sanctuary and continuing in The Dust, Eridium Blight and Sawtooth Cauldron locations.
Background
- "Mordecai has determined that if you find where the Warrior is buried, you will find Jack. The Hyperion Info Stockade has the info you need."
Walkthrough
Objectives
- Go to Eridium Blight
- Find Sawtooth Cauldron
- Enter Smoking Guanno Grotto
- Kill Ambush Commanders: 0/4
- Enter Main Street Reservoir
- Enter Cramfist's Foundry
- Find buzzard hangars
- Open buzzard hangar
- Destroy Boombringer
- +Scare Mortar and look like a badass
- Ascend Inferno Tower
- +Kill Mortar
- Destroy buzzards: 0/5
- Steal Odomo crates: 0/4
- Head to Arid Nexus
Strategy
The preliminary targets is to get to the Arid Nexus bridge in Eridium Blight across The Dust and then proceed to Sawtooth Cauldron.
Arriving at the place, Vault Hunters need to reach The Buzzard Nest at the top of Inferno Tower in order to neutralise the defending buzzards and prime the Odomo crates for pick up. Along the way are various location objectives and a lot of hostile bandits.
Jump down, go into the "Smoking Guanno Grotto" and follow across the cave to the lift. Once reaching the elevator's base and trying to call it down, Sawtooth leader Mortar notices them and keeps the elevator up, while summoning an ambush on the Vault Hunters. This attack is fronted by four Ambush Commanders (who are essentially Nomad Taskmasters) spawning at both sides of the elevator and attacking at once, making this a particularly intense fight.
The second objectives entail simply passing through a reservoir and Cramfist's Foundry. This means passing through areas not only teeming with hostile bandits, but also a lake area populated by several threshers. The usual base units of tadpole threshers are present, but encounters may well include a wormhole thresher, and sometimes a badass Pyre Thresher. The ultimate goal is for Boombringer, a grounded buzzard belonging to Mortar. Just shoot the Boombringer. But it is protected by two automated Gatling turrets, several buzzards and a number of bandit units. The optional goal triggered by Brick over ECHO is to turn away from the Boombringer explosion to "look like a scuffle" and scare Mortar.
The ultimate goal is for Boombringer, a grounded buzzard belonging to Mortar. While the objective itself is a simple process of pointing a weapon at it and pulling the trigger, the path to reach it is protected by two automated Gatling turrets, several buzzards and a number of bandit units. An optional objective, prompted by Brick over the ECHO, is to turn away from the Boombringer's explosion to "look badass" and to scare Mortar.

"Cool guys don't look at explosions."
Upon returning to the Foundry, Mortar himself arrives, down the elevator, to exact retribution for his beloved ride. The area should be clear by this point, and without backup, he is little better than a very tough bandit with a powerful gun.
The elevator will take characters to the top of Inferno Tower which proves to be an open deck with minimal cover. This is a problem as the regular bandits are reinforced by five buzzards, and these five must all be destroyed. Once this has been done, the four Odomo crates can be tagged for pick up by four Slab Support Buzzards. Brick will tell then the fastest and badassest way possible to get back to the fast travel station: jumping off the tower.
Vault Hunters then drive to the Arid Nexus bridge, which Brick's buzzards come to bomb for it to descend. The mission is then turned in at Arid Nexus' Catch-A-Ride.
Completion
- "Thanks to Brick's buzzards and your own capacity for extreme violence, you now have what you need to blast your way into the Hyperion Info Stockade and find out where the Warrior is buried."
Turn In: Arid Nexus
Mission Transcript
- Main article: Toil and Trouble/Transcript
Notes
- Aggravating the Goliaths, on the Buzzards' Nest, will help you reduce their presence. Letting them jump at the Buzzards will end them up falling off to their deaths.
Trivia
- The Odomo explosive crates are named after Maré Odomo, illustrator and friend of Borderlands 2 lead writer Anthony Burch.
Video Walkthroughs
 (40 KB)")
")
")
")