[[Category:{{{game}}} missions]][[Category:Sledge's Safe House missions]]
Sledge: To The Safe House is the third in a four part series of missions which lead to the destruction of Sledge. The missions are necessary to unlock the final exit from the Arid Badlands.
Walkthrough
thumb|300px|right|Video walkthrough
Objectives
- Obtain the Mine Gate Key and take it to Headstone Mine.
- Mine Gate Key: 0/1
- "The note you found suggests that the Mine Gate Key can be found at Sledge's Safe House to the north."
Description
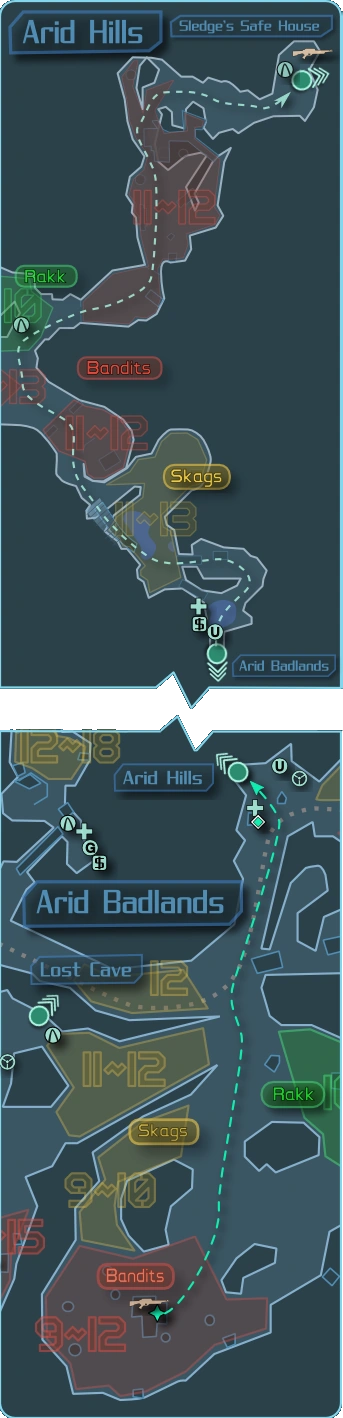
Once the mission has been accepted, take the transition into the Arid Hills. A number of Skags short distance beyond the transition will present the first obstacle and several groups of bandits beyond them also bar the way. Sledge's Safe House lies to the north beyond several of these encounters.
Sledge's Safe House is a sprawling interior zone with a large circular room at the end where a boss battle takes place.
Medical and ammunition Vending Machines just inside the door provide the last point of sale before moving through this area. Further supplies must be gained from drops or chests beyond the first few fights.
Part of the way through the building a disabled Claptrap can be found, which will offer the mission Claptrap Rescue: Safe House. The quickest way to handle this side mission is to reach the robot through a barred opening before heading up the ramp to the next stage, thus avoiding the need to double back for the Repair Kit in the room directly above. It is worth doing this immediately due to the Backpack SDU reward, as well as the remote location of this Claptrap rescue.
The rest of the area is swarming with bandit encounters of all types. Badass Psychos can prove to be troublesome in games with higher player counts when they charge into melee, leaving limited evasive options in the confined space of this area. There are also several set piece battles, including one where a siren heralds the approach of a pack of Mutant Midget Psychos, and another where the final boss, Roid Rage Psycho will attack in conjunction with a small hoard of midgets.
Strategy
- 1. The conventional strategy for the boss battle is to keep running, killing the midgets first and taking shots at the boss when you can. He will charge you and will also throw grenades at you, thus the need to stay mobile. If you are killed, you will spawn in an area away from the arena. When you get back there, the best case scenario is if the boss has come up where you can fire at him without having to drop into the entry area again. (Again, you cannot fire through the fence, so he will need to be to the side of it.) It is also possible that he will go through the entry area himself and into the next room. If neither of these happen, then you have to go back in.
- 2. Another way to beat the boss easily is to kill all of the midget warriors and then jump back into the small pit at the entrance. When the Roid Rage Pyscho comes in after you, he will be unable to get out. Simply jump out and fire away. (The boss can get out of the pit, though it is possible to run into a scenario where he stays in it. A bigger danger is that you get down into the pit and he stays out and lobs grenades into the pit with you, which has been known to happen.)
- 3. Yet another way to defeat the boss is to stay in the pit and kill the boss from there. By not stepping into the arena-like boss area, you cause the boss to stay where he is and not engage you. In one side of the pit are a stack of boxes that you jump up on to enter the arena. By standing on one of the boxes, you can position yourself to get clear line-of-sight to the boss through a vertical gap on one side of the chain-link fence. You can snipe at the Roid Rage Psycho's large head safely from this vantage point. The boss will remain stationary even while taking fire as long as you stay in the pit; he will move a step or so from taking hits. It is even possible to exit the pit and cause him to move, then to step back into the pit and cause him to become stationary again. Some of his aides may attack you, but this is something that can be easily handled. In the event that you aggro the boss and you die, you can still take this approach as your death will cause him to become stationary again. (As noted under #2, this strategy does not always work.)
- 4. It is also possible to get the Roid Rage Psycho's head stuck in the fence. If you die, you can shoot at the mesh fence to get his attention when you respawn. He may run up to the fence and possibly get his head stuck in it for a bit (he will glitch so half his body is on your side of the fence), which will allow you to shoot him and get critical hits. He can still frag you occasionally somehow so be ready to avoid them. If he moves out of the net he MAY go back but if he doesn't, you may have to go into the arena after him.
- 5. Another, less exploitative strategy is to take advantage of the Roid Rage Psycho's fleshy nature by utilizing incendiary weapons and skills. Once he's alight, you can begin dealing with the Midget Psychos, stopping periodically to re-ignite him. Alternatively, you can ignore the Midget Psychos and focus entirely on the big guy; since the midgets have a fairly limited effective range, you can avoid most damage from them by staying mobile. Also, due to his relatively high health, you can take full advantage of corrosive weapons' increased damage DoT.
- 6. Another way to clean the area is after entering the pit and jumping into the circular area, get the enemies to chase you. Run the circular area and return to the pit. Once there, leap onto the boxes in the corner of the pit. From the top box, have your character sprint and jump to the previously unreachable ledge you first entered the pit from. You should land on top of the row of computers just underneath it. From there you can jump once more back onto the ledge, and fire at the midgets and the Roid Rage Psycho though the fence with a sniper rifle. You can always practice leaping from the boxes to the ledge before entering the circle and starting the fight.
- 7. Another strategy is to shoot through the fences right behind the pit with a sniper. They don't stop bullets like the one right in front of the pit
After killing him, you will find a button hanging down near the center of the room. Press it and the key rises up in the center.
A platform extends across the entry drop-down point and you can walk out of the arena. You will have to fight your way back out of the Safe house, which will not be any easier than when you fought your way in. You can go back the way you came in, but some new doors will be open letting you take a different, but probably no easier, way out. The advantage of the new route is that it will have more loot to pick up.
Completion
- "When the grisly 'key' is placed on the thumbprint scanner, the gate unlocks. Now that you can enter Headstone Mine, it's time to take the fight to Sledge."
Additional Information
Notes
- The text on the Mine Gate Key reads: A keyring of thumbs. Opens the Headstone Mine Entrance. Evidently the bandits needed the thumb prints of their former captors, so they simply took them.
Nearby Missions
There are two missions that take place in the Arid Hills. It is suggested that The Legend Of Moe and Marley and Scavenger: Sniper Rifle be completed while en route to the safe house.