No edit summary |
|||
| (56 intermediate revisions by 29 users not shown) | |||
| Line 1: | Line 1: | ||
| − | {{infobox |
+ | {{infobox mission |
| − | |name = Sledge: To The Safe House |
+ | |name = Sledge:<br />To The Safe House |
| + | |image = <gallery> |
||
| ⚫ | |||
| + | Sledge To SafeHouse.jpg|View |
||
| ⚫ | |||
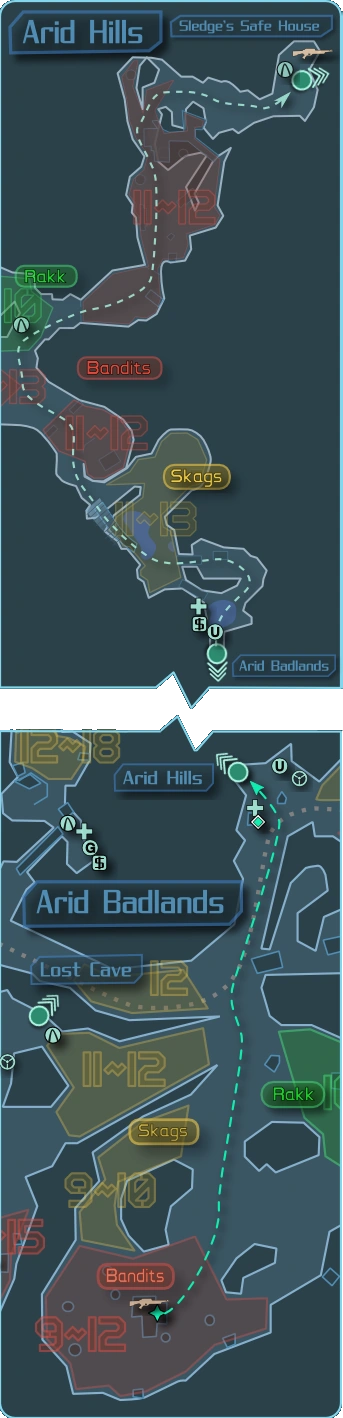
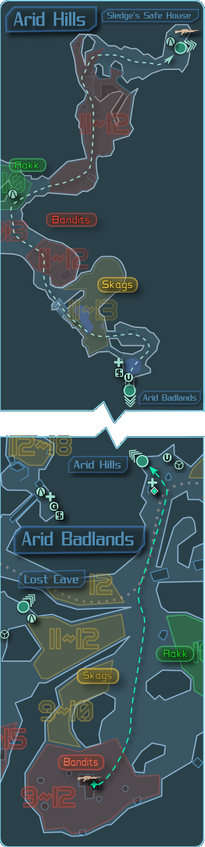
| + | Slege's_Safe_House_Route.png|Map |
||
| ⚫ | |||
| + | </gallery> |
||
| ⚫ | |||
| + | |imagewidth = |
||
| ⚫ | |||
| − | | |
+ | |location = [[Sledge's Safe House]] |
| ⚫ | |||
| ⚫ | |||
| ⚫ | |||
| + | |level2 = 37 |
||
| + | |rewards2 = 16848 XP |
||
| ⚫ | |||
| + | |next = [[Sledge: Battle For The Badlands]] |
||
| + | | game = Borderlands |
||
| + | | dlc = |
||
| + | | type = Story mission |
||
}} |
}} |
||
| + | '''Sledge: To The Safe House''' is a story mission in ''[[Borderlands]]'' given by [[Shep Sanders]]. It is the third into series of four missions which lead to the demise of [[Sledge]]. |
||
| + | __TOC__ |
||
| + | ==Background== |
||
| ⚫ | |||
| + | ==Walkthrough== |
||
| + | [[Image:Sledge To The Safe House|thumb|300px|right|Video walkthrough]] |
||
| + | [[Image:ToTheSafeHouse.png|right|205px|thumb]] |
||
| ⚫ | |||
| ⚫ | |||
| ⚫ | |||
| − | == |
+ | ===Strategy=== |
| + | Once the mission has been accepted, the next step is to take the transition into the [[Arid Hills]]. A number of [[skag]]s a short distance beyond the transition will present the first obstacle and several groups of [[Bandit (faction)|bandits]] beyond them also bar the way. [[Sledge's Safe House]] lies to the north beyond several of these encounters. |
||
| ⚫ | |||
| ⚫ | |||
| + | Medical and ammunition [[Vending Machine]]s just inside the door provide the last point of sale before moving through this area. Further supplies must be gained from drops or chests beyond the first few fights. |
||
| + | Part of the way through the building a disabled [[Claptrap (robots)|Claptrap]] can be found, which will offer the mission [[Claptrap Rescue: Safe House]]. The quickest way to handle this side mission is to reach the robot through a barred opening before heading up the ramp to the next stage, thus avoiding the need to double back for the [[Repair Kit]] in the room directly above. It is worth doing this immediately due to the [[Backpack SDU]] reward, as well as the remote location of this Claptrap rescue. |
||
| ⚫ | |||
| ⚫ | |||
| + | The rest of the area is swarming with bandit encounters of all types. [[Psycho|Badass Psychos]] can prove to be troublesome in games with higher player counts when they charge into melee, leaving limited evasive options in the confined space of this area. There are also several set piece battles, including one where a siren heralds the approach of a pack of [[Mutant Midget Psycho]]s, and another where the final boss, [[Roid Rage Psycho]] will attack in conjunction with a small horde of midgets. |
||
| ⚫ | |||
| + | The conventional strategy for the boss battle is to keep running, killing the midgets first and taking shots at the Roid Rage Psycho whenever practical. He will charge and will also throw [[MIRV]] or [[Grenade mods|Bouncing Betty]] grenades, thus emphasising the need to stay mobile. Killed [[Vault hunters]] will respawn away from the arena and may have the opportunity to re-engage without having to drop into the pit, although this generally requires being able to shoot past the fence rather than through it. |
||
| + | The Roid Rage Psycho can be set alight, so {{element link|incendiary}} damage weapons can also be effective to keep him burning during run-and-gun fighting while avoiding contact. {{element link|Corrosive}} weapons can be employed to similar effect. |
||
| − | === Description === |
||
| + | Another way to beat the boss is to kill all of the midgets and then jump back into the small pit at the entrance. This can sometimes lure the boss into the pit where he will have trouble getting out, although attracts an element of risk with his grenades likely to land in close proximity of any characters in the pit at the time. |
||
| + | Another strategy is to shoot through the fences right behind the pit with a sniper rifle. They don't stop bullets like the one right in front of the pit. |
||
| − | Once you obtain this quest you will need to travel back towards [[Shep Sanders]] and take the transition into the [[Arid Hills]]. After fighting your way north you will arrive at the transition for [[Sledge's Safe House]]. |
||
| ⚫ | |||
| ⚫ | |||
| ⚫ | A platform then extends across the pit. The fight back through the safe house, will not be any easier than the fight coming in, but some new doors will be open allowing players to choose a different path. It's shorter, but just as dangerous per room. The advantage of the new route is that it will have additional loot to pick up. |
||
| − | When you first enter the safe house, vending machines will be on your right. Down the first hallway are several enemies and your first of many tough battles. Fortunately, you can easily keep coming back to the vending machines to restock ammo and health after the first couple of battles. Once you get further along, you will have to rely on finding ammo. |
||
| ⚫ | |||
| − | As you go through the building, you will come across a disabled [[Claptrap]] which will give you the quest [[Claptrap Rescue: Safe House]], which will be the first in a series of rescue quests throughout the game. You can either keep the Mine Gate Key as the current objective and put off fixing the Claptrap until your way out, or you can backtrack a few rooms to pick up the repair kit (which is on top of some pipes near the ceiling). It is worth doing this immediately as you will be awarded a [[Backpack SDU]], which will give you an additional 3 backpack slots. |
||
| + | :''"When the grisly 'key' is placed on the thumbprint scanner, the gate unlocks. Now that you can enter Headstone Mine, it's time to take the fight to Sledge."'' |
||
| + | ==Nearby Missions== |
||
| − | To enter the big round room for the BOSS battle, you have to drop down into a small area then jump up into the room, at which point the BOSS will come out, accompanied by a bunch of midget warriors. Once you drop down, the only way back out is to die or to kill the BOSS. Although a chain-link fence is all that separates the entry area from the arena, you cannot fire through it as you usually can most such fences in the safe house. |
||
| + | *[[The Legend Of Moe and Marley]] |
||
| + | *[[Scavenger: Sniper Rifle]] |
||
| + | *[[Scavenger: Combat Rifle]] |
||
| + | *[[What Hit The Fan]] |
||
| ⚫ | |||
| − | The boss is one of the few non-named bosses you will fight during the game. He is simple called a 'Roid Rage Psycho'. |
||
| + | *The text on the Mine Gate Key reads: ''A keyring of thumbs. Opens the Headstone Mine Entrance.'' Evidently the bandits needed the thumb prints of their former captors, so they simply took them. |
||
| + | {{clr}} |
||
| + | {{Missions}} |
||
| + | <!-- Interwiki links --> |
||
| − | === Strategy === |
||
| ⚫ | |||
| − | |||
| + | [[ru:Следж: путь к укрытию]] |
||
| − | |||
| + | [[uk:Следж: Остання інстанція]] |
||
| − | :1. The conventional strategy for the BOSS battle is to keep running, killing the midgets first and taking shots at the BOSS when you can. He will charge you and will also throw grenades at you, thus the need to stay mobile. If you get killed, you will spawn in an area away from the arena. When you get back there, the best case scenario is if the BOSS has come up where you can fire at him without having to drop into the entry area again. (Again, you cannot fire through the fence, so he will need to be to the side of it.) It is also possible that he will go through the entry area himself and into the next room. If neither of these happen, then you have to go back in. |
||
| − | |||
| − | :2. Another way to beat the BOSS easily is to kill all of the midget warriors and then jump back into the small pit at the entrance. When the BOSS comes in after you he will be unable to get out. Simply jump out and fire away. (The BOSS *can* get out of the pit, though it is possible to run into a scenario where he stays in it. A bigger danger is that you get down into the pit and he stays out and lobs grenades into the pit with you, which has been known to happen.) |
||
| − | |||
| − | :3. Yet another way to defeat the boss is to stay in the pit and kill the boss from there. By not stepping into the arena-like boss area, you cause the boss to stay where he is and not engage you. In one side of the pit are a stack of boxes that you jump up on to enter the arena. By standing on one of the boxes, you can position yourself to get clear line-of-sight to the boss through a vertical gap on one side of the chain-link fence. You can snipe the bosses' head safely from this vantage point. The boss will remain stationary even while taking fire as long as you stay in the pit; he will move a step or so from taking hits. It is even possible to enter the pit and cause him to move, then to step back into the pit and cause him to become stationary again. Some of his adds may attack you, but this is something that can be easily handled. In the event that you aggro the boss and you die, you can still take this approach as your death will cause him to become stationary again. |
||
| − | |||
| − | :4. It is also possible to get the boss' head stuck in the fence. If you die, you can shoot at the mesh fence to get his attention when you respawn. He will run up to the fence and possibly get his head stuck in it for a bit (he will glitch so half his body is on your side of the fence) which opens him for some intense sniper fire. I put 49 rounds of 176 damage sniper ammo into him in the time he was in the fence, all crits which was 7/8ths of his health. He can still frag you occasionally somehow so be ready to run a couple of meters and then lay back down the fire. Ff he moves out of the net he MAY go back but if he doesn't try going into the hole and taking the rest of his health with your sniper of machine gun like in (A) I was a lvl 12 when i did it these ways and they work with some luck. |
||
| − | |||
| ⚫ | |||
| − | |||
| ⚫ | A platform extends across the |
||
| − | |||
| ⚫ | |||
| − | |||
| − | === Notable Loot === |
||
| − | |||
| − | Once you defeat the mini-boss and retrieve the key there is no specific loot which drops off of the boss or any special weapon chest available. |
||
| − | |||
| ⚫ | |||
| − | |||
| − | This is one of several quests that take place in the [[Arid Hills]]. While completing this quest is suggested that you do [[The Legend Of Moe and Marley]] and [[Scavenger: Sniper Rifle]]. |
||
| − | [[Category:Story Missions]] |
||
Revision as of 21:42, 29 May 2019
[[Category:Sledge's Safe House missions]]
Sledge: To The Safe House is a story mission in Borderlands given by Shep Sanders. It is the third into series of four missions which lead to the demise of Sledge.
Background
- "The note you found suggests that the Mine Gate Key can be found at Sledge's Safe House to the north."
Walkthrough

Sledge To The Safe House
Video walkthrough
Objectives
- Obtain the Mine Gate Key and take it to Headstone Mine.
- Mine Gate Key
Strategy
Once the mission has been accepted, the next step is to take the transition into the Arid Hills. A number of skags a short distance beyond the transition will present the first obstacle and several groups of bandits beyond them also bar the way. Sledge's Safe House lies to the north beyond several of these encounters.
Sledge's Safe House is a sprawling interior zone with a large circular room at the end where a boss battle takes place.
Medical and ammunition Vending Machines just inside the door provide the last point of sale before moving through this area. Further supplies must be gained from drops or chests beyond the first few fights.
Part of the way through the building a disabled Claptrap can be found, which will offer the mission Claptrap Rescue: Safe House. The quickest way to handle this side mission is to reach the robot through a barred opening before heading up the ramp to the next stage, thus avoiding the need to double back for the Repair Kit in the room directly above. It is worth doing this immediately due to the Backpack SDU reward, as well as the remote location of this Claptrap rescue.
The rest of the area is swarming with bandit encounters of all types. Badass Psychos can prove to be troublesome in games with higher player counts when they charge into melee, leaving limited evasive options in the confined space of this area. There are also several set piece battles, including one where a siren heralds the approach of a pack of Mutant Midget Psychos, and another where the final boss, Roid Rage Psycho will attack in conjunction with a small horde of midgets.
The conventional strategy for the boss battle is to keep running, killing the midgets first and taking shots at the Roid Rage Psycho whenever practical. He will charge and will also throw MIRV or Bouncing Betty grenades, thus emphasising the need to stay mobile. Killed Vault hunters will respawn away from the arena and may have the opportunity to re-engage without having to drop into the pit, although this generally requires being able to shoot past the fence rather than through it.
The Roid Rage Psycho can be set alight, so incendiary damage weapons can also be effective to keep him burning during run-and-gun fighting while avoiding contact. Corrosive weapons can be employed to similar effect.
Another way to beat the boss is to kill all of the midgets and then jump back into the small pit at the entrance. This can sometimes lure the boss into the pit where he will have trouble getting out, although attracts an element of risk with his grenades likely to land in close proximity of any characters in the pit at the time.
Another strategy is to shoot through the fences right behind the pit with a sniper rifle. They don't stop bullets like the one right in front of the pit.
After the Roid Rage Psycho is dead, a button becomes available near the center of the room. Pressing it causes a key to rise from an aperture in the floor.
A platform then extends across the pit. The fight back through the safe house, will not be any easier than the fight coming in, but some new doors will be open allowing players to choose a different path. It's shorter, but just as dangerous per room. The advantage of the new route is that it will have additional loot to pick up.
Completion
- "When the grisly 'key' is placed on the thumbprint scanner, the gate unlocks. Now that you can enter Headstone Mine, it's time to take the fight to Sledge."
Nearby Missions
Notes
- The text on the Mine Gate Key reads: A keyring of thumbs. Opens the Headstone Mine Entrance. Evidently the bandits needed the thumb prints of their former captors, so they simply took them.